Pages

Showing posts with label construction. Show all posts

Friday, July 26, 2013

The bad, the good, and the ugly. Aka- the bees have swarmed.

07-26-13

Well, if you've been paying attention to the blog, you know that a little over two weeks ago our bees were bearding and seemed to be getting ready to swarm. It appeared as though they had moved into the second box, and we decided to add a third box to give them more space. The ultimate goal being to have at least two full boxes of honey comb on which the bees could over winter. Well, on Tuesday of this week, I headed out to my parents' house to check on our bees. Hoping and pretty much expecting to see our bees filling out the second box and settling in with the third box we added. This, unfortunately, was NOT the case as you can see in the video below.


So, quick recap of the news:
- Bad news, the bees have swarmed.
- Good news, our bait hive worked and we caught the bees.
- Ugly news, the bait hive, which started out level, no longer is and we will probably have to deal with cross combing or at the very least crooked combs as we move them to their new home.

What's the plan now?

In the video I mentioned recombining the hive back into one. I had thought this would be the best idea, as we're shooting for two full Warre boxes to overwinter our bees. I find it unlikely at this point that the bees, if kept separate, will make it to two full boxes. However, I wanted another opinion. I decided to contact Sam from Bee Crazy and ask his advice. If you've read my posts or watched my videos, you've probably heard me mention this excellent resource. Sam was gracious enough to answer my questions and offer some advice. You can see our conversation at his site here.

Bottom line. I'm going to head out to my parents' later today. I've got two extra Warre boxes, I'll build a couple more along with another base, roof, and quilt, and then we'll move the bees from the bait hive to their new home. I'll the two hives (our original and our new swarm hive) grow and develop separately and see how their doing come this fall. If it appears they might be strong enough to winter on their own, we'll leave them apart. If, on the other hand, they seem weak, we'll attempt at that point to combine them.

Thanks also to Sam for answering my question about the white stuff on the plexiglass. It is, apparently, just wax. That's what my hunch was, it just wasn't there initially, and I was worried it might be some sort of mold or something. Sam's explanation of WHY they were starting to put was on the hive walls was helpful, however. He mentioned that it often starts appearing as the hive gets ready to swarm. Basically, the colony thinks they're out of room (even though they weren't) and the wax producing bees start putting wax on the walls of the hive instead of being productive and building usable comb in the empty space they do have available. I'll try to keep an eye out for this in the future as the white specks started appearing a few weeks before the bees were bearding, before (I thought) they had moved down into the second box.

I'll let you know how it goes and hopefully post some video later tonight or tomorrow!

Monday, July 15, 2013

Ants and wasps and and broken screws, oh my!

06-29-13

It's been a while! I'm sorry I've been so busy; there's a lot we need to catch up on! As you can see in the video at the end of this post, we've got good news and bad news. The good news is that the bees have finally moved down into the second box. I was getting worried there for a little bit.


The bad news is that ants have invaded the quilt. As far as I could tell by peeling back a bit of the top cloth, they're not in the hive itself, just the quilt. This is still annoying, however, as they're nasty little buggers that bite when they get on you (you can see in the video, I thought I had my first bee sting, but it was just an ant that crawled up my back). They're also pulling out all the quilt material (sawdust) and dumping it all over the ground. This is not good cause we need that there to insulate the hive and help pull the moisture out.


After some research online, I found out that ants HATE cinnamon, but the bees don't mind it. We've decided to use cinnamon around the base of the hive, mix a bit with petroleum jelly to create another barrier around the bottom box, and finally added some cinnamon directly to the quilt material as well.


Another bit of bad news is the fact that there are paper wasps that decided the roof made a convenient home. You can't see it in the video, but our assistant beekeeper (my dad) used a yard stick to smash the wasps nest. She hasn't been back since!

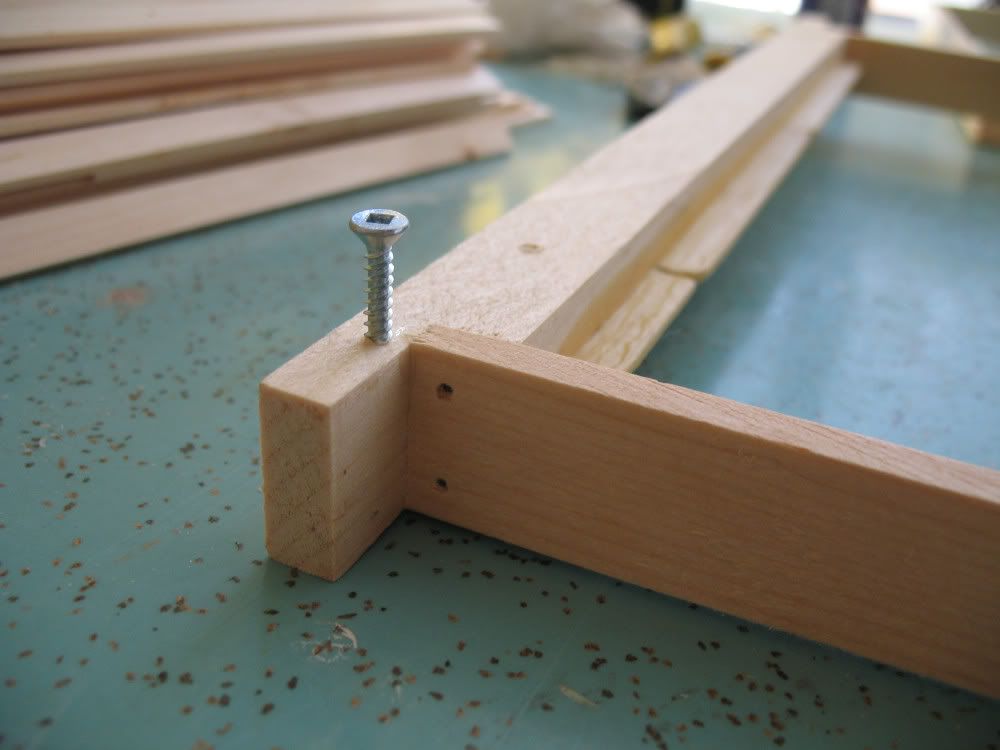
The final bit of bad news was the fact that two of the screws holding the roof and mouse board together actually broke. So we need to take that apart and put new screws on. Thankfully my dad had a box of these screws lying around, which we used to fix it all up. These short deck screws are actually what I was looking for in the first place when we built the hive. I just never found them. If you decide to take it upon yourself to build a hive at some point DEFINITELY use these short deck screws and not the generic zinc plated wood screws.


Thanks for reading! After much beating around the bush, here's the video...


06-30-13

So, I was back out at my parents' house the day after we cleaned all the ants out. Guess what? More ants!! Figured out we didn't put the petroleum jelly/cinnamon mixture on the straps holding our hive together and that's where the ants were crawling in and out. Here's another short video explaining everything.


Friday, June 14, 2013

Two new videos. Hive activity and bait hive/frame construction.

06-08-11

Here's a short video of the activity at the front of our hive and the inside (seen through the observation window) after about one month after installation. They seem to be doing pretty well. They're fairly active today, thankfully, it's been one of the only nice days we've had all spring. It's been pretty rainy and wet here. As you can see they're brining in pollen, which is a very good sign that the queen is laying. You can also see the top box is pretty much 100% full. You can see in the bottom box that they have not yet started building comb in that box. The only thing there is the small bit of comb that I moved down to try and encourage them to start building there. Not sure what else to do to try to get them to move down. If you've got any ideas, leave a comment.


06-11-13

This second video is a little bit longer. In it, I explain how I built two more bait hives. This time the with the correct internal volume! One is made out of two empty Warre boxes that I put a base and lid on and attached together. I forgot to mention in the video that I drilled some holes in the bottom box for the bees to use as an entrance. If I ever need to use that particular box in a hive, I'll just plug the holes with some quark. The second bait hive is made out of scrap wood I got for free from craigslist. I made it with just a skill saw, jig saw, and hand drill to show how easy it can be to build a bee hive. I did use the lath we ripped to size on my dad's table saw, however. So there's still that part that's a bit harder to do. Need to figure out an easy way to make those top bars without any special tools. In this video, I also show how I made some frames and half-frames to fit in a standard, unmodified Warre hive. I made these to use with my widow-less boxes so we can do inspections in them. I also made them to see how they worked in case anyone ever need to have removable frames for a beehive permit or what not. I still like the idea of Warre's system, using minimal intrusion and to simply let the bees be bees and do their thing, but it's nice to experiment and come up with way to let the bees do their thing and still be able to check on them once in a while. If one were to truly do minimally invasing beeking, it might be more like the Japanese system, which is pretty much the same as a Warre hive, but with no top bars at all, just some cross braces to give the honey comb some support and then let the bees make the comb any which way they please. I'm rambling now, though, here's the video.


Monday, June 3, 2013

Inspection 16 days after installation. Probably the last big manipulation for a while.

5-27-13
Well, here's the most intensive hive inspection/maintenance we've performed yet and, quite possibly, the most intensive we'll get all summer. Warre advocated for minimal hive inspection/maintenance, and that's probably what shoot for here on out. Honestly, that's one thing I appreciate about Warre's design. I don't have to constantly be running out to make sure everything is going okay. In fact, as you'll see in this video, we have a bit of cross combing starting in the top box (more on that after the video), but with this design, you really manipulate boxes, not individual combs, so I'm really not going to worry about it that much. Plus, with the observation window built into each box we've made so far, we can at least observe them a little bit that way. It's unlikely we'll move or inspect any more comb until we harvest an entire box at the end of the summer (hopefully!) or next year (more likely).


So, as you can see in the video, there was a bit of cross combing. Here's a picture that shows it in a little more detail. The dashed line is likely the first comb they built and is dead center. Everything to the right and left, as you can see, is shifted toward that bar. There's an empty space on the right that I'm not sure what the bees will do with now and a little bit of cross-combing on the left as you can see in the circle.


Here's some close ups of the cross-combing and the emptey space.


5-29-13
So after the video was taken (on a Monday) I went home and respaced the bars in the box that used to house the jar feeder. I ended up putting nine bars in (which I have seen on some webpages/discussion boards before, see Warre Top Bar Spacing and Bar Spacing on a Warre Hive) because that's what it appears the bees were trying to do. I'll just oblige them, right? Give the bees what they want! I came back on Wednesday, switched out the empty bottom box for the new box with the nine bars, and we'll see what they do now.

In doing this, I also changed how I had the bars spaced and secured. In the pictures above you can see I used a 1 inch wire nail that, more or less, acts as a pin to keep the bar in place (I drilled the hole it rests in larger than the nail so it just slips in and out). This was rather difficult to measure and drill all the holes, plus you can't change it once it's done, and I've already lost a bunch of nails. While researching the whole Warre bar spacing question, I discovered this amazing blog Bee Crazy which had an ingenious approach to bar spacing. As you can see in the following picture, Sam just screwed a small spacer screw to the side of each top bar. By screwing them futher in or out, you can adjust the distance between the bars. Brilliant! Oh, and FYI, Sam is in Canada and has used Kenyan Top Bar Hives and now Warre Hives. Yay for more information on keeping top bar bees in cold climates!

Thursday, May 23, 2013

More on making a bait hive from our extra Warre box

I've got some pictures of the construction of our bait hive a few posts back. Here's a video talking about preparing the hive to put out and using our beeswax "polish" to seal/waterproof the outside of the hive.


Wednesday, May 15, 2013

Our extra Warre box transformed into a bait hive

In preparation for beekeeping this spring, I read a number of books (you can read some of my reviews here) including McCartney Taylor's book Swarm Traps and Bait Hives. I thought it would be great fun to try and capture a swarm of feral bees. Ultimately, however, I decided to purchase package bees, at least this first year, to guarantee that we had bees instead of sitting around all summer twiddling our fingers. On of the upshots of deciding to build a Warre hive as opposed to a Kenyan Top Bar was that we have extra boxes sitting around and doing nothing right now. I decided to take an extra box (or two or three if I build more) and make them into bait hives.

According to McCartney Taylor, the ideal interior dimensions of a bait hive should equal 40 liters. I don't know about you, but I don't think in liters. Here's what it turns out to be in cubic inches:
- McCartney Taylor's interior dimensions are 19.25" x 13" x 10" = 2502.5 inches cubed.

Contrast that with the interior dimensions of one Warre hive box:
- Warre box interior dimensions are 11.8" x11.8" x 8" = 1113.92 inches cubed.

That ends up being about half of what Taylor recommended. What's the downside of a smaller box? Well, aside from the obvious (the bees might not like it as much and decide not to take up residence there), apparently smaller cavities are more easily accepted by Africanized honey bees (i.e. "killer" bees). Thankfully, we don't have Africanized honey bees in Minnesota, so, despite the smaller size I decided to go for it and build the bait trap. More likely I'll catch a swarm with a small box than if I don't put one out at all, right?

In the future, I may use two Warre boxes bungeed together to make a trap (that would be almost exactly the right size). Or if I decide to make specific bait traps, I could make one double long, but still fit my Warre top bars. Then, after the trapped bees have started building comb, I could move the correctly sized top bars to a waiting Warre hive. That's all in the future, however, so I'll just show you what I did for now.

First, I cut out a single piece of plywood and screwed it on as a cover. I chose a single piece here, to keep rain from dripping onto the bees.


Then I cut two pieces to use as the bottom of the trap. I didn't have a big enough piece of plywood left over to make a single pieced bottom. I figured it didn't matter as much on the bottom if there was a seam, no rain water would leak in there anyway. Then, near the edge of on of the bottom pieces I used a jig saw to cut a 2" hole, and I staples some straightened out paper clips across the hole to keep birds out.


And then I attached both these pieces to the bottom with screws. And that's really about it. Taylor adds a piece to the back that he uses to hang it from. I think I'm just going to set one out on a little deck we have that we never use, and if I make another, I'll bungee that to a tree (level of course) in my father-in-law's backyard.


It's nice that we made our boxes with windows. It will be easy to check on any swarms we happen to catch to see how their comb construction is coming a long.


Here's the last picture. You can see the 2" hole near the back of the box.

Pictures of the homemade jar feeder

So, in case you didn't know, spring in Minnesota arrived over a month late this year. I know, I know... You're saying, "Minnesota has spring?" Yes, yes we do. Normally in April. This year we had two winter storm warnings (ended up getting about 6 inches each time) during the first week of May. In fact, the day we got our bee package (May 11) we had some weird snow/sleet stuff falling for a bit. Long story short, I didn't know if I was going to build a feeder or not, but with the late spring and smaller package of bees (our supplier changed every one's 3# package to 2# due to the bee shortages), I decided I had better feed for at least a little while. After doing some research, I thought a jar feeder would be easiest to build and operate. I liked the double jar feeder at Bee Thinking quite a bit and made a quadruple jar feeder based on the pictures at their website. Here's how I made it.
 
 
This is a piece of plywood cut to fit inside one of our Warre's boxes. It ended up being not quite square due to the plexi-glass windows inside our boxes. I marked up the edge strips and center where the lath would be, and used a standard mason jar top to trace where the holes would be. Then I used a jig saw to cut them out.


Here are the four holes cut out, with the first layer of lath in place, ready to nail on.
 
 
And here it is again with a piece of 1/8th inch hardware cloth attached. I did this to keep the bees from coming up into the box when changing the jars out, and to give them something to hang on to when their upside down beneath the feeders. The hardware cloth was then covered again on the outside with the lath. This was done to give the bees just enough "bee space" underneath the feeder so they wouldn't fill it with comb. FYI- in order to allow them to come up into the feeder, I cut about 2-3 inches off of one end of my top cloth, that way they have about an inch strip along one end where they can come up. When I remove the feeder later this spring, I'll just put a new, full sized top cloth in its place.
 

Here's the finished product with four jars in place.

And a view from the underside.
 
 
So far in the first four and a half days we've had our bees, they've gone through about two and a half jars of sugar/water (50/50 ratio) syrup. I'm not sure how long I'll feed them. At least until the first major bloom which my dad thinks will be the wild plum trees sometime this weekend. After that, I'm not sure how long. I want to give my bees a good start since their numbers are so diminished, but I don't want to keep them from doing their thing naturally either. I'll have to keep you updated on that.

Tuesday, May 14, 2013

Finishing the Beehive


After we took the pre-cut parts for the beehive home, there was more that the kids could help with.


This is me and James stapling the felt in place and screwing together some of the extra boxes. Noah and little sister Mary got to help out with this as well.


This is a close up of the toggle we made to keep the windows in place. We used a small piece of the lath that was cut narrowring for the top bars. I think I made the toggle 2.5 or 3 inches long and just screwed it in place.


This is what I decided to use for sealing the hive. If we had used cedar to make the hive, this wouldn't have been necessary. However, as ceder was more than 3 times as expensive as pine, we had to seal it. I was originally going to make a linseed oil and beeswax paint, a-la McCartney Taylor, but I thought that might be too messy (and not to mention hot... burning hazard!) to use with little kids helping out. I found this recipe on you tube instead for a beeswax "polish." for lack of a better term. It's equal parts (we usex 8oz each) of beeswax, linseed oil, and turpentine. Now, I know the linseed oil is "boiled" which means there are addatives in it that might not be the best for the bees. Also, I'm not sure the how the turpentine affects the bees either, but all it is is distilled pine resin. I still decided to go this route, however, for a couple reasons. First, it's only going to be on the outside of the hive. Second, the turpentine will evaporate. And third, it just seemed so much easier. In the future, I might find somewhere to order raw linseed oil, but for now, this is what we did.

I made a "water bath" to melt the beeswax in, then added the linseed oil and turpentine. It was liquid at first, so you had to let it sit until the next day. Then it turned into a semi-solid polish that we could rub in with old rags (cut up t-shirt).


Here are James (top) and Noah (bottom) "polishing" the hive to make it waterproof.


The next big task was to make the beeswax starter strip on the top bars. I liked what McCartney Taylor did with the beeswax and cotton string, but thought his technique (using a soldering iron to melt the wax, could be simplified).0

Instead, I cut the string to length...

... dropped it into a jar of melted wax...

... and took it out with a pliers. Then I held one end down with a screwdriver and streatched it out into a straight line with the pliers. The beeswax hardened quickly, so it wasn't too hard to get it to stick into place on the top bars. Some tips, though, DON'T put more than one string into the wax at at time. They WILL fray. Also,  the wax will hardened almost instantaneously on the metal pliers, so you need to really push it down on the other end with the screwdriver so you can get the pliers unstuck.

All in all, it was a good technique, however. I got four boxed done (32 top bars) in less than an hour. Here are the results.


The last thing that needed to be done was to staple the burlap on to the quilt...

... and fill it with sawdust we saved from hive construction.


Here's our finished product! We let the whole thing sit for about two weeks for the polish to soak in before we moved it outside.


Here we are at Grandpa's leveling some left over cement landscaping blocks to set the hive on. I think we did this about two or three days before "bee day."


I'm going to bed now. I'll try to put up more pictures tomorrow. I've still got to show you how I made the jar feeder and also a bait trap out of a spare box. After that I'll try to figure out how to do some simple video editing and put up some videos from "bee day." Until then... Goodbye!

Constructing the Beehive

The lumber, three 1x10x12s, also a piece of plywood and a package of all purpose lath in the back. Note the snow in the background. This might be Minnesota, but we usually don't have snow in April. In fact, we had two winter storm warnings in May as well. Our spring arrived so late that our shipment of bees kept getting postponed.


Grandpa, cutting the plywood on the radial arm saw. We also used this saw to cut the 1x10s to length as well as the top bars.

Our surprise find. The all purpose lath. It was the perfect height for the top bars so we just had to cut it into narrower strips and then to length. We also used it for the toggles to keep the windows in place, as well as for the jar feeder.

The "help" (i.e. - junior beekeepers Noah and James), got very bored on day one. Luckily they brought some books to read.

This is proof that I did something. This is me using a jig saw to free hand the windows in the boxes.

Here's how they ended up. On the right is some felt that I had lying around that we used as a sort of insulation. We stapled it under the plexiglass on on the backside of the windows. Time will tell if that was a good idea or not.

A guide we made on the table saw to cut the lath to the right dimensions for the top bars. We alsu used this saw to cut all the boards to the correct width and the plexiglass too.

Here's the table saw again with grandpa cutting the plexiglass to size. Notices the bandages on his fingers. This is day two. On day one we had a little accident with the table saw and a trip to the ER. He wasn't doing anything wrong, in fact we had already given the boys the "safety talk" about power tools and were being extra careful. It just caught a knot or something and kicked back. Thankfully, one of the safety precautions grandpa was using was having the blad only set to an eight of an inch higher than the lumber he was cutting. This action literally saved his fingers! The worst that happened was a lost finger nail. Respect the tools! They can be dangerous even when used correctly. Take all appropriate safety measures!!

The "help" got bored on day two as well. They took to climbing trees to pass the time.

Although... there was a little more for them to help out with. This is Noah stapling the felt to the back side of the box, underneath where the plexiglass will be.

Here's the roof coming together. The top board is one of the places we used the plywood. This board, in Warre's plan, was thinner than the rest. I assume because it needs to breath to allow moisture to evaporate from the quilt. I hope the glue holding the plywood together can breath!

The roof. again. Almost done!

And here's what we got accomplished in two days at Grandpa's. The base, one box, the quilt, and the roof. The rest of the pieces are cut out and the holes drilled as well, so we'll finish those at home.

And, to thank the boys for their patients, we surprised them with some swords we made.