Pages

Showing posts with label bee suits. Show all posts

Monday, June 3, 2013

Inspection 16 days after installation. Probably the last big manipulation for a while.

5-27-13
Well, here's the most intensive hive inspection/maintenance we've performed yet and, quite possibly, the most intensive we'll get all summer. Warre advocated for minimal hive inspection/maintenance, and that's probably what shoot for here on out. Honestly, that's one thing I appreciate about Warre's design. I don't have to constantly be running out to make sure everything is going okay. In fact, as you'll see in this video, we have a bit of cross combing starting in the top box (more on that after the video), but with this design, you really manipulate boxes, not individual combs, so I'm really not going to worry about it that much. Plus, with the observation window built into each box we've made so far, we can at least observe them a little bit that way. It's unlikely we'll move or inspect any more comb until we harvest an entire box at the end of the summer (hopefully!) or next year (more likely).


So, as you can see in the video, there was a bit of cross combing. Here's a picture that shows it in a little more detail. The dashed line is likely the first comb they built and is dead center. Everything to the right and left, as you can see, is shifted toward that bar. There's an empty space on the right that I'm not sure what the bees will do with now and a little bit of cross-combing on the left as you can see in the circle.


Here's some close ups of the cross-combing and the emptey space.


5-29-13
So after the video was taken (on a Monday) I went home and respaced the bars in the box that used to house the jar feeder. I ended up putting nine bars in (which I have seen on some webpages/discussion boards before, see Warre Top Bar Spacing and Bar Spacing on a Warre Hive) because that's what it appears the bees were trying to do. I'll just oblige them, right? Give the bees what they want! I came back on Wednesday, switched out the empty bottom box for the new box with the nine bars, and we'll see what they do now.

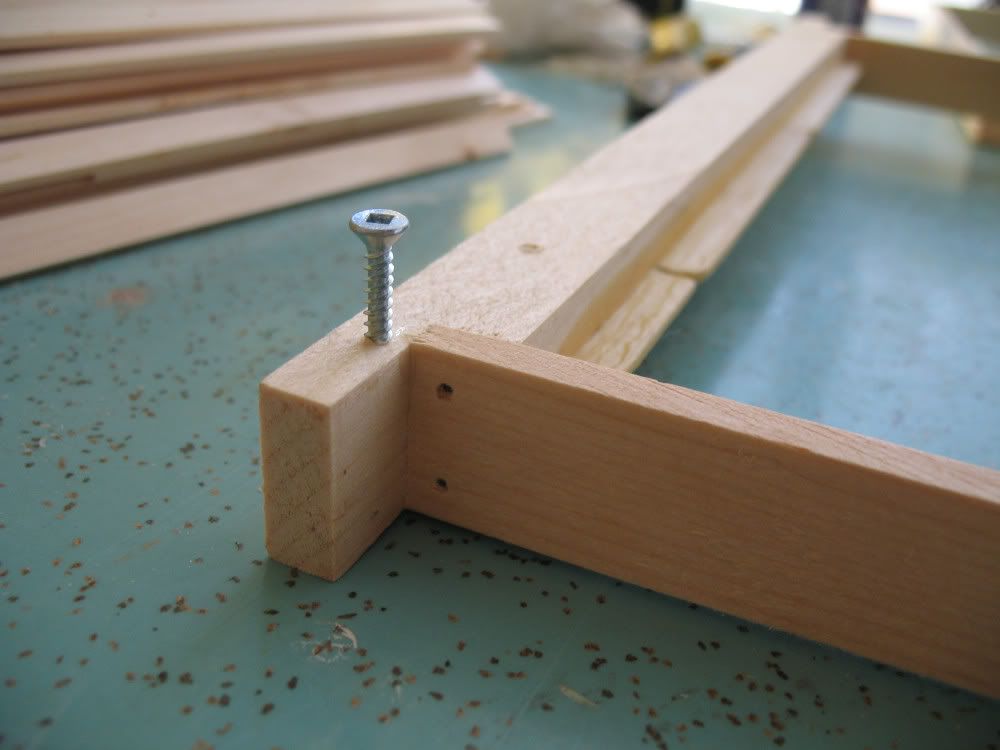
In doing this, I also changed how I had the bars spaced and secured. In the pictures above you can see I used a 1 inch wire nail that, more or less, acts as a pin to keep the bar in place (I drilled the hole it rests in larger than the nail so it just slips in and out). This was rather difficult to measure and drill all the holes, plus you can't change it once it's done, and I've already lost a bunch of nails. While researching the whole Warre bar spacing question, I discovered this amazing blog Bee Crazy which had an ingenious approach to bar spacing. As you can see in the following picture, Sam just screwed a small spacer screw to the side of each top bar. By screwing them futher in or out, you can adjust the distance between the bars. Brilliant! Oh, and FYI, Sam is in Canada and has used Kenyan Top Bar Hives and now Warre Hives. Yay for more information on keeping top bar bees in cold climates!
Wednesday, May 22, 2013

Lighting our smoker for the first time and our first beehive inspection 05-15-13

After soccer on last Wednesday, we stopped by Grandpa's to check on our bees for the first time. We passed our first test (lighting the smoker and getting it to stay lit) and were surprised by how active the bees have been. Whoever came up with the phrase "busy as a bee" wasn't joking! Look at how much they've accomplished in just four days!


In addition to what you can see in the video, check out the picture below. I wasn't sure how much foraging they'd be doing with Minnesota's late spring, but the bees have already found flowers and are bringing in pollen. We saw bees with yellow, orange, and white pollen.


Again, sorry about the picture quality, but in this picture you can see a little more of the comb coming down from the top bars. You can also see from the lines where the bees are, in other words, where there's more comb coming down that you can't see.


Pretty amazing work for only four days in a late spring!

Tuesday, May 21, 2013

Bee Day Videos 05-11-13

Well, I finally figured out how to use Windows Live Movie Maker to edit these clips together. Here's the video of our first ever experience with live honey bees. I'll pretty much let it speak for itself. Just be warned, however, the videographer was a eight year old boy. It is, at times, shaky. And, at others, not even pointing in the right direction. Still, I think it captured the day quite well, and I can watch it over and over again just as enthralled as when I was actually there with the bees.

More videos coming soon. Here's the first...


Wednesday, April 17, 2013

A random hodgepodge

Wanted to write another update before we started building the hive on Saturday, just to go over a few things.

First, I found out that Mann Lake, Ltd. was still taking orders though the end of this week. I guess that answers my question on whether or not to purchase packaged bees or trap a swarm! I did end up purchases a 3lb package and now am feeling some mixed emotions. I was excited about the possibility of testing out my swarm trapping abilities, but this will probably be better in the end. My 8 and 6 year old boys would have been very disappointed if we made it the whole summer without getting any bees through our trapping efforts! I'm a little frustrated that I have to drive 3.5 hours one way to pick them up though (I live in the Twin Cities Metro Area and have to pick them up north of Brainerd, MN)! But that's my fault for ordering late. Plus I don't know what the pick up day will be yet. Probably the first or second Saturday in May. I'm hoping the first, then we'd have them in time to take pictures before my boys' science fair. Plus I work the second Saturday at 3pm, which would make for a LONG day, driving early in the morning to get them in time to get home, install them, and get to work...

Second, I also ordered a bee suit for me, a smoker, a hive tool, and some beeswax from eBay. I'm using the wax for a little starter strip on the top bars, as well to help seal the hive (see point four below). I also need to figure out a less expensive bee suit option for my dad and two boys. McCartney Taylor (Learning Beekeeping) has some good ideas about that. I'll explain more (also in point four below).

Third, here's a link to the plans we're using to make the Warre Hive. We're going to make a few modifications, however. We're making at least two of the four boxes with windows, and I like the look of the windows and the simpler construction on the hives as seen at Bee Thinking. Also, we MIGHT try to do something similar to their screened bottom with removable board to keep track of Varroa mites. We'll see how construction goes on Saturday. We're going to make the hive out of high quality pine from Menard's because the red cedar is about 3 times more expensive. We'll seal the hive with a combination of linseed oil and beeswax. Hopefully we'll have it all done and set up by the time the bees get here!

Finally, I wanted to mention McCartney Taylor's excellent resource on top bar hives (Learning Beekeeping) . I mentioned his book Swarm Traps and Bait Hives in my last post, and I would highly recommend browsing through his You Tube videos (Out of a Blue Sky). This is one of the first resources I found when beginning my research on top bar hives, and still one of the best. Almost makes me feel bad that I decided to tray the Warre Hive instead of the Kenyan style. Only issue I have with the information he provides is that it all is in relation to beekeeping in Texas. Not all of it translates to this northern climate, which is part of the reason I started this blog. Of special interest today are his videos on using beeswax for starter strips on the top bars and sealing the hive with linseed oil and beeswax. Also his video on inexpensive bee suits. I'll probably go that route for an extra suit for my dad to use when we're both there (he can use mine if he wants to get into the hive and I'm not around) and for my boys (I don't want to purchase actual suits as they're still a bit young to do hive maintenance and they're growing so fast). If you didn't watch the video, he basically recommends to use a wide brimmed hat with a mosquito net over it, and then to purchase a disposable, plastic painter's coverall (found them for about $7 on eBay). Won't necessarily protect you from stings if the bees really want to, but should be sufficient coverage for someone just standing nearby observing.

Hope this info helps someone out there. Pictures will be up after we make the beehive on Saturday!